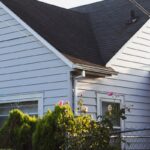
If you’ve ever wondered whether your roof is “too flat” for asphalt shingles, you’re not alone. Roof slope for shingle roofs decides how well water sheds, which warranties apply, and frankly, how long the roof lasts. We’ve seen gorgeous installs of asphalt shingles fail early because the slope wasn’t right, great products on the wrong slope is like snow tires in July. It’ll move, but not the way you want.
In rainy Western Washington, from Tacoma to the northern Sound, roof slope matters even more. We’ll break down minimums and maximums, how to measure roof slope accurately, and the practical best practices we use on real homes. If you’re shopping for asphalt shingles or planning a re-roof, this guide helps you understand the slope or pitch for a shingle roof that works with your climate, codes, and budget.
Roof Slope Basics For Shingle Roofs
What Roof Slope Means (Rise Over Run And Degrees)
Roof slope describes how steep a roof is. It’s expressed as rise over run, how many inches the roof rises vertically for every 12 inches of horizontal run. So a 4:12 roof rises 4 inches for every foot.
We can also express slope in degrees. A 4:12 slope is roughly 18.4°. A 9:12 slope is about 36.9°. Pros use both systems, but specs for asphalt shingles and building codes typically talk in rise-over-run. The rise over run ratio is key to understanding roof slope.
Why Slope Matters For Water Shedding And Warranty
Asphalt shingles are water-shedding, not waterproof. On steeper roofs, water and debris move off fast. On lower slopes, water lingers, which increases leak risk at laps, valleys, and nail penetrations. Manufacturers write their warranties and instructions around this physics.
According to the International Residential Code (IRC), asphalt shingles can’t go below 2:12 slope, and 2:12–4:12 requires special underlayment treatment for extra protection IRC R905.2.2. If we ignore those rules, warranties are on thin ice, and leaks show up sooner than anyone wants.
Minimum and Maximum Slope For Asphalt Shingles
Typical manufacturer and code guidelines
The common minimum roof pitch, also known as the minimum slope, for asphalt shingles is 2:12, period. The minimum slope requirement is critical for proper asphalt shingle installation. Between 2:12 and 4:12, most manufacturers require either double layer underlayment or a full self-adhered ice/water barrier from eave to at least 24 inches inside the warm wall. That’s straight from code and mirrored by big brands like GAF and CertainTeed (see their application guides: GAF and CertainTeed). Shingle manufacturers set these rules to prevent issues like moisture penetration and premature deterioration.
The minimum slope for asphalt shingle roofs ensures durability and prevents water pooling. For example, the minimum slope requirement helps avoid lateral water movement on the roof deck. The absolute minimum slope for asphalt shingles is 2:12 to maintain warranty and performance. Shingle manufacturers emphasize that the minimum slope is essential for the roofing system. The required minimum slope is 2:12, but local building codes may have additional regulations. The minimum slope for residential roofs with asphalt shingles is designed to handle environmental factors like wind driven rain and severe weather. Most manufacturers agree that ignoring the minimum slope can lead to problems. The minimum slope requirement is mirrored in commercial roofing guidelines as well, though flat roofs use different roofing material.
Below 2:12, asphalt shingles are not allowed by code. Use a low slope membrane instead (modified bitumen, TPO, PVC, or EPDM). A flat roof or very low slope roof needs these materials for easy installation and great value. Above 4:12, standard shingle installation methods apply, and asphalt shingles perform very well with good flashing. For installing asphalt shingles on steeper roofs, the process is straightforward.
Low-slope versus steep-slope considerations
A low slope roof (2:12–4:12) needs meticulous detailing, longer ice/water membranes, sealed valleys, and careful lap management. We also watch for ice dam potential on shaded eaves. A low slope roof increases the risk of moisture penetration if not handled properly. Installing asphalt shingles on a low slope roof requires special installation considerations.
Steep-slope (let’s say 9:12 and up) improves drainage and longevity but increases wind uplift on each shingle. In some conditions or cold weather, shingle manufacturers recommend hand-sealing tabs with roofing cement and using additional fasteners on high-wind sites. There’s no hard “maximum” in code for asphalt shingles, but once we’re into very steep, think 12:12 and beyond, labor, safety, and hand-sealing practices change the game. Steeper roofs offer better protection from the sun’s rays and extend horizontally less per rise.
How to Measure Roof Slope Accurately
Measuring from the attic or exterior
From the attic, lay a 12-inch level on the bottom side of a rafter and measure vertically from the rafter surface to the level’s 12-inch mark with a tape measure. That number is your rise. If it’s 5 inches, you’ve got a 5:12. The horizontal distance is always 12 inches in this simple geometry.
From the exterior, set a level on the shingle surface, mark 12 inches on the level, then measure straight down from the level to the shingle at that mark. Same math, same answer. It’s simple, but mind your footing, wet morning dew on a 9:12 is no joke. The lower end of the roof can be slippery.
Use a handy roof slope estimator like the Pitch Gauge app for quick results. Some providers even provide pitch estimator cards, but digital tools are more accurate for determining different roof slopes.
Converting slope to degrees and using tools or apps
To convert to degrees, use arctangent (rise ÷ 12). Handy, but we’re not trying to be trigonometry heroes on the ridge. A digital angle finder or an app like Pitch Gauge does it instantly (Pitch Gauge). Laser levels and smart inclinometers are common in our kits now, too.
For documentation, insurance, permits, HOA, we’ll often note both the slope ratio and degree angle. That avoids confusion if an architect’s drawing calls out degrees while the roofer’s bid lists 6:12.
Choosing the Right Slope for Your Home
Climate and weather factors
Rain-first climates like Puget Sound favor at least 4:12 for asphalt shingle roofs because drainage improves dramatically. East of the Cascades, where snow loads spike, we lean steeper to help snow slide and to reduce ice dam risk. Wind off the Strait can argue for different fastening patterns, but slope still rules how water leaves the deck.
We’ve re-roofed bungalows in Tacoma with 3:12 porches where asphalt shingles kept getting chewed up at the seams. Switching the porch to a membrane while leaving the main 6:12 roof in asphalt shingles solved the “mystery leaks.” Sometimes mixed systems are the smart play. The underlying structure must support the chosen roofing material.
Local Building Codes and HOA Requirements
The Washington State Building Code (based on the IRC) sets the minimums. Some jurisdictions add ice-barrier rules depending on local history of ice damming, check with your city or county building department (Seattle’s code resources are here: Seattle SDCI Codes). HOAs may dictate minimum pitch for architectural styles or require certain shingle profiles, like premium designer styles or three tab shingles. We always review CCRs before final design so nobody’s arguing at the ARC meeting. Local building codes ensure the minimum slope requirement is met for safety and durability.
When a Membrane Roof is a Better Fit Than Asphalt Shingles
If the slope is under 2:12, or you’ve got long, standing-snow eaves, or a dead-flat rear addition, go membrane. A flat roof uses modified bitumen or TPO with proper edge metal and tapered insulation eliminates ponding at scuppers and makes gutters behave. And yes, a flat roof can still look clean next to asphalt shingles when we detail the transition flashing right. We’d rather specify a membrane for a flat roof than force asphalt shingles where they don’t belong. Shingles on a low slope roof can lead to water pooling and reduced durability.
Installation Details That Change With Slope
Underlayment, ice barriers, and leak protection
For 2:12–4:12, we install either a full ice/water shield or two plies of underlayment per IRC R905.2.7, lapped precisely. On steeper slopes, a high-quality synthetic underlayment over the whole deck gives better walkability and tear resistance than old 15# felt. A single layer is often sufficient above 4:12.
Ice barriers at eaves and valleys are required in some cold regions IRC R905.1.2. Western Washington isn’t always in the “ice-belt,” but shaded north eaves in places like Snohomish still benefit from a self-adhered membrane under the starter course. Cheap insurance.
Flashing at valleys, walls, and penetrations
Valleys on low slope roof sections? We prefer open metal valleys with W-style or center crimp. On steeper roofs, closed-cut valleys look cleaner, but we still upsize the valley metal when debris is a problem (think fir needles). At sidewalls, it’s step flashing every course with a proper kick-out at the base. Chimneys get counterflashing and, if they’re wide, a cricket to split the flow. Pipe boots must match slope and be set under the course above, tiny detail, big difference.
Ventilation and safety on steeper roofs
Balanced intake and exhaust ventilation keeps asphalt shingles cooler and drys the deck. Aim for 1:150 net free area (or 1:300 with a proper vapor barrier), split roughly 50/50 between soffit intake and ridge exhaust. The DOE’s attic ventilation guidance is a good primer.
Safety-wise, anything above 6:12 deserves roof jacks, planks, and fall protection per OSHA. On 10:12 and steeper, staging and time go up: it’s not just “scarier,” it’s slower, which affects cost.
Cost, Lifespan, and Maintenance by Slope
Material, labor, and access impacts
Steeper roofs have more surface area over the same footprint, so material counts rise a bit. Labor rises more. Extra staging, hand-sealing in certain conditions, and slower movement add hours. Low slope roof shingle sections need upgraded underlayment or membranes, which pushes material cost instead. Either way, slope nudges the budget. Materials like asphalt shingles provide great value for residential roofs.
We’ve found that well-detailed 6:12–9:12 asphalt shingle roofs often outlast identical asphalt shingles on 3:12 roofs simply because they shed water better and dry faster. Manufacturers will agree (quietly) that drainage is king.
Drainage, debris, and seasonal maintenance
Flat-ish valleys collect needles and seed pods, especially around maples and firs. Plan on seasonal cleanups, fall and late spring, plus clear gutters and check the downspout terminations. In the PNW, moss is a recurring villain. Gentle cleaning, zinc or copper strips near the ridge, and better sun exposure on steeper roofs help. Washington State University even has a practical note on roof moss control (WSU Extension PDF). A little maintenance beats a lot of repairs.
Conclusion
Slope is the quiet variable that decides whether asphalt shingles thrive or just hang on. If we’re at 2:12–4:12, we beef up underlayments: if we’re under 2:12, we pivot to membranes: and if we’re steep, we plan for safety and handwork. It’s not complicated, but it is precise.
Frequently Asked Questions
What is the minimum slope for a shingle roof?
The minimum slope for a shingle roof is 2:12. Between 2:12 and 4:12, asphalt shingles require enhanced underlayment—typically a full ice/water barrier or two layers of underlayment—to meet code and maintain warranty coverage. Below 2:12, asphalt shingles aren’t allowed; use a low-slope membrane like TPO, PVC, EPDM, or modified bitumen.
Is a 3:12 slope good for a shingle roof in rainy climates like Western Washington?
A 3:12 slope is permitted with upgraded underlayment, but it sheds water more slowly, increasing leak risk. In rain-first regions, 4:12 or steeper performs better. Many pros switch low-slope sections (porches, dead-flat additions) to a membrane while keeping the main roof shingled for reliability and warranty peace of mind.
How do I measure the slope for a shingle roof accurately?
From the attic, place a 12-inch level on a rafter and measure the vertical rise at the 12-inch mark—e.g., 5 inches equals 5:12. On the exterior, do the same on the shingle surface. Apps and digital angle finders (e.g., Pitch Gauge) can display slope or degrees instantly. Prioritize safety—wet shingles are slippery.
What’s the best slope for a shingle roof to maximize lifespan?
Roofs around 6:12–9:12 often outlast identical asphalt shingles on 3:12 because they shed water and dry faster. Very steep slopes improve drainage but can increase wind uplift, sometimes requiring hand-sealing and extra fasteners in cold or high-wind conditions. There’s no strict code maximum; practices and labor needs change as slopes get steeper.
How can I check the slope for a shingle roof without climbing on it?
Use a smartphone inclinometer: stand back, sight along the rake (gable) edge, align the phone with the trim’s angle, and read the degrees, then convert to slope (tan° × 12). Some apps estimate rise over a 12-inch run.
Can I change my roof slope so shingles will work?
Altering slope usually requires reframing rafters or replacing trusses, structural engineering, and permits—often cost-prohibitive on existing homes. It also affects wall heights, gables, and flashing. Most homeowners keep the structure and choose the right material: asphalt shingles at 2:12+ with proper underlayment, or a low-slope membrane below 2:12.
Oliver Lemon is a Milton Keynes-based professional roofer who specializes in residential and commercial roofing installations, repairs, and maintenance.
Recent Post