If you’ve ever chased a mysterious ceiling stain that wasn’t anywhere near the middle of the roof, you’ve met flashing, indirectly. Roof flashing is the thin, shaped metal that kicks water away from seams, walls, chimneys, and penetrations. Without it, roofs leak even when the shingles are brand new.
Roof flashing is especially important for both shingled roofs and metal roofs, as it protects the roof’s surface from water infiltration. It is installed around roof valleys, roof penetrations like vent pipes and chimneys, and other roof features to prevent leaks. This makes roof flashing important for weatherproofing vulnerable areas and maintaining the integrity of your roofing system.
We’ll explain what roof flashing does, the main types, what it’s made from, and how to keep it working. And because we roof in the rainy Northwest, we’ll call out tips for wind-driven rain, ice, and coastal exposure too.
Introduction to Roofing Systems
If you’re a homeowner, you likely understand that your roofing system is much more than just shingles or tiles—it’s your home’s first line of defense, a carefully engineered shield designed to protect everything you hold dear from rain, wind, and the relentless forces of weather. At the heart of every effective roofing system that truly works for you is roof flashing, a thin metal guardian that plays a crucial role in preventing those dreaded roof leaks that can turn your safe haven into a source of stress.
You’ll find roof flashing strategically positioned wherever shingles meet and butt against features like walls, chimneys, or valleys—those vulnerable intersections where water loves to find its way in. Different types of roof flashing, such as counter flashing, chimney flashing, and valley flashing, are each like specialized sentries, tailored to direct water away from specific problem areas that could otherwise compromise your peace of mind.
When you take the time to understand how these protective components work together in harmony, you can truly appreciate how a well-designed roofing system becomes your home’s steadfast defender, keeping your sanctuary dry, secure, and damage-free through every storm life throws your way.
What Roof Flashing Does and Why It Matters
Roof systems are water-shedding, not watertight. Flashing is the steering wheel, it directs water off risky joints so gravity can finish the job.
Where roofs meet walls, skylights, chimneys, or pipes, the shingles can’t seal every angle. Capillary action, wind, and debris push water sideways. Properly lapped flashing creates a stepped pathway so water exits onto the surface instead of sneaking behind it. Flashing protects vulnerable areas, especially at roof penetrations, and prevents water from entering the roof system by forming a barrier at seams, joints, and edges. Roof flashing works by directing water away from these critical points, ensuring the roof structure stays dry and protected.
Most leaks we diagnose trace back to missing, corroded, or mis-lapped flashing, often due to improper flashing or flashing that was not installed correctly. Codes back this up. The International Residential Code requires flashing at roof-to-wall intersections, penetrations, and valleys IRC 2021, R903.2.1. In short: if it’s a junction, it needs flashing.
Common Flashing Types and Where They Go
Step, Counter/Base, and Valley Flashing
We use step flashing along sidewalls where shingles climb past siding. Each L-shaped piece tucks under a shingle and up the wall, piece by piece, so water can’t back-flow. Typical sizes run around 8”×8” or 10”×7”, depending on shingle exposure.
Counter flashing covers step flashing on masonry. It’s cut into a reglet joint and bent to shed water over the step pieces. Base (or apron) flashing sits at the bottom of dormers and chimneys: it’s wide and lays over shingles to push water away. In valleys, we install valley flashing (open metal or closed-cut with an ice/water membrane beneath) to collect flow from two roof planes.
Flashing is especially important where the roof intersects with a vertical surface, such as a wall or chimney, to prevent leaks at these junctions. The roof pitch also influences the type and installation of flashing in these areas, as steeper or lower slopes may require different materials or methods.
Drip Edge, Kickout, and Edge Metals
Drip edge is the metal at eaves and rakes that guides runoff into gutters and stops capillary wicking into the fascia. The IRC specifically calls for drip edge on asphalt shingle roofs R905.2. We like hemmed D-metal at the coast and F5-style on rakes for stiffness. Flashing at the roof’s edge and roof edges is essential for preventing water intrusion and enhancing the durability of the roof. Roofing cement is sometimes used to seal drip edge and kickout flashing to ensure a watertight installation.
Kickout flashing (diverter) sits where a roof dies into a wall at the eave. It “kicks” water into the gutter instead of down the siding, a notorious rot spot if it’s missing. On low-slope or flat roofs, edge metals include gravel stop and coping caps, which secure membranes and control runoff so it doesn’t creep under.
Pipe Boots, Skylights, and Chimney Systems
Plumbing vents use boots: a formed cone (EPDM, neoprene, lead, or flexible TPO) welded or crimped to a metal base. Pipe boots and similar features are roof penetrations that require careful flashing to prevent leaks, as improper installation can lead to water damage and structural issues. Sun-baked rubber can crack around year 10–15: we keep an eye there.
Avoid placing pressure treated wood in direct contact with metal flashing, as it can accelerate corrosion and damage the metal components.
Skylights get factory flashing kits, head, sill, and step pieces, that integrate with shingles and underlayment. VELUX kits are the standard reference for pitched roofs VELUX flashing systems.
Chimneys need a full system: base/apron, step along the sides, counter flashing set into the mortar, and a cricket (saddle) behind wider stacks to split the flow. Skimp here and you’ll be patching forever.
Roof Decking and Roof Flashing
If you’re planning a roofing project, you need to understand that the relationship between roof decking and roof flashing is absolutely fundamental to achieving the leak-free roof you deserve. Your roof decking forms that solid, dependable base that supports your roofing material—think of it as the foundation that everything else relies on.
Meanwhile, your roof flashing gets installed at those critical, vulnerable points where water loves to sneak in—places like roof protrusions and vertical walls—and it’s your first line of defense against water trying to seep through and cause you headaches down the road.
When you’re choosing your flashing material, whether you go with galvanized steel for its incredible durability, aluminum for the flexibility you might need, or copper for that unmatched longevity, you want to make sure it’s perfectly matched to what your specific roofing project actually demands.
Here’s what you need to remember: proper installation of your roof flashing at these vulnerable areas isn’t just important—it’s absolutely essential to prevent water penetration and those dreaded roof leaks that can turn your life upside down, and when you get this right, you’re ensuring that both your roof decking and your entire roofing system stay protected and serve you well for years and years to come.
Materials, Compatibility, and Durability
Metal Choices and Pros/Cons
Galvanized steel is common and cost-effective: factory paint adds life. Aluminum bends easily and resists rust, but it’s softer and can react with alkaline masonry.
Copper lasts decades, solders beautifully, and looks sharp, pricey though. Stainless steel is our coastal workhorse: it laughs at salt spray. Lead is still used for some pipe jacks because it forms well, but we avoid it on hot, sunny slopes where creep can occur.
Roof flashing cost varies depending on the material you choose, with copper and stainless steel being more expensive options compared to galvanized steel or aluminum.
Avoiding Corrosion and Matching to Roof Types
Dissimilar metals can fight each other. Copper above aluminum gutters, for instance, can trigger galvanic corrosion when water carries ions between them. We pair metals intelligently and isolate with sealants or membranes when needed.
Cedar and some treated woods are acidic: they can chew up bare steel. We prefer stainless or copper with cedar shakes. In marine air, fasteners must match the metal, stainless nails for stainless flashing, so the system ages evenly.
The choice of flashing should always be matched to the roofing materials used, as different roofing materials—such as shingles, slate, or cedar shakes—require specific solutions. Materials like aluminum flashing are commonly selected for both residential and commercial roofing projects due to their durability and resistance to corrosion, making them a reliable option for a wide range of roofing projects.
Installation Basics and Code Considerations
Overlaps, Fasteners, and Sealants
Water flows downhill (until wind says otherwise), so laps must face the flow. We overlap step flashing a minimum of 2 inches, valleys 4–6 inches depending on pitch and rainfall. Nails go high, through the flange that’s covered by the next shingle, never exposed in the water path.
Sealant is a helper, not the hero. We favor high-quality butyl or polyurethane where the manufacturer allows. Relying on caulk alone is a short-term patch, fine after a storm, not fine as a “fix.” Roofing sealant is commonly used to secure flashing in place and ensure waterproofing at critical joints.
Membranes, Slope, and Manufacturer Requirements
Underlayment matters. In valleys, around chimneys, and at eaves in snow country, we install self-adhered ice-and-water membranes. The steeper the slope, the more forgiving open valleys are: low slopes often need wider metal and strict underlayment laps. Open roof valleys require specific metal valley flashing to prevent leaks in these vulnerable areas.
Always marry practice to the book: shingle and skylight manufacturers publish exact flashing details, and the IRC’s flashing rule R903.2.1 sets minimums. For nuanced details, the NRCA manuals are the industry’s cheat sheet.
Common Mistakes to Avoid
If you’re dealing with roof flashing, you’re probably aware that a few common mistakes can quickly turn into a cascade of costly roof leaks and repairs—the kind that make you think, “How did I not see this coming?” One major pitfall that catches many homeowners off guard is improper installation—when flashing isn’t lapped, fastened, or sealed correctly, water becomes like a persistent infiltrator that will find its way in (no matter how small the opening).
Using the wrong flashing material is another frequent error that can really undermine your home’s protective shield; for example, installing aluminum flashing on a copper roof creates a chemical reaction that causes corrosion, completely destroying the watertight seal you desperately need to keep your sanctuary safe.
Neglecting regular inspections can also result in damaged flashing going unnoticed until leaks appear—and by then, you might be thinking, “I should have caught this sooner.” To avoid these issues that can leave you feeling overwhelmed and financially drained, it’s wise to hire a professional roofing contractor who truly understands the nuances of flashing materials and installation (someone who’s seen it all before). Their expertise helps ensure your roof flashing is installed and maintained correctly, creating that reliable protective barrier that keeps your home—and your peace of mind—intact.
Signs of Trouble, Repairs, and Costs
Symptoms to Look For
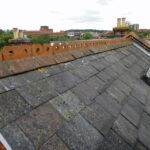
Stains along ceilings near exterior walls, peeling paint, and swollen trim often point to bad kickouts or sidewall flashing. In attics, look for rusty nails, dark sheathing, or daylight along chimneys.
Outside, check for bent valley metal, cracked pipe boots, loose mortar at chimney counter flashing, and gutters overflowing behind drip edge. After a big sou’easter in the Puget Sound, we recheck windward walls, wind-driven rain is sneaky.
Regular inspection and maintenance of flashing is essential to prevent roof leaks and avoid costly repairs.
Repair vs Replacement and When to Call a Pro
Small fixes, resealing a reglet, swapping a cracked boot, are reasonable maintenance. But if step flashing was skipped or lapped backward, shingles and sometimes siding must be removed to rebuild it correctly. That’s a tear-back job.
Chimney systems with failed mortar or no cricket? We rebuild, not band-aid. When structural rot or complex intersections show up, bringing in a licensed roofer is the safe play. If you’re in Washington, the team at NearMe Roofing Company can assess flashing issues and handle full-system repairs.
A roofing professional or skilled roofing contractors are essential to ensure flashing is installed correctly and provides lasting protection.
Typical Price Ranges and Cost Factors
Ballpark only, materials, access, and height change everything. Replacing a single pipe boot often lands around $150–$450. Valley metal sections run $300–$900 depending on length and slope.
Chimney reflashing, including counter flashing and a small cricket, may range $800–$2,500: tuckpointing is extra. Skylight flashing kits with labor commonly fall in the $600–$1,500 window. During full reroofs, new step and drip edge are typically included.
Benefits of Proper Roof Flashing
If you’re considering investing in proper roof flashing, you’re making a decision that will truly pay off for you in multiple ways. First and foremost, you can feel confident knowing it prevents those dreaded roof leaks by channeling water away from the vulnerable areas of your home, significantly reducing your risk of facing structural damage and those costly repairs that can be so overwhelming.
When you choose quality flashing material—like copper flashing or gutter apron flashing—and ensure it’s properly installed, you’re extending the lifespan of your entire roofing system and helping maintain its integrity for years to come. You’ll also discover that effective roof flashing contributes to your home’s energy efficiency by minimizing heat loss and gain, which means more comfort for you and your family.
And here’s something you might not expect: it can actually enhance your roof’s appearance by providing those clean, finished lines at edges and joints that make your home look well-cared-for. Whether you’re dealing with apron flashing at the base of a wall or a gutter apron protecting your eaves, taking the right approach to roof flashing isn’t just about maintenance—it’s about safeguarding your investment and ensuring you can trust that your home will stay dry and secure.
DIY vs. Professional Installation
If you’re considering tackling roof flashing installation yourself, you likely understand the appeal—there’s something deeply satisfying about protecting your home with your own two hands. But here’s the thing: while that DIY spirit is admirable, roof flashing is one area where stepping outside your comfort zone might actually step you into a world of costly mistakes.
Think of your roof as your home’s first line of defense against the elements, and flashing—whether it’s metal flashing, drip edge flashing, or edge flashing—serves as those critical seal points where water tries to find its way in. A professional roofing contractor doesn’t just know which materials to choose; they understand how water moves like a persistent intruder across your roof’s surface, always seeking the smallest weakness. They’ll create that watertight barrier you need, ensure everything meets local building codes and manufacturer requirements—which is absolutely crucial for warranty coverage and long-term peace of mind.
Yes, the idea of doing it yourself might feel empowering, but the reality is that flashing mistakes don’t just cause minor roof leaks—they can spiral into expensive repairs that make you wish you’d trusted a professional from the start. When it comes to protecting what matters most, sometimes the bravest choice is knowing when to call in the experts who can expand your home’s defense system properly.
Maintenance and Climate Tips
Inspection Schedule and Simple Upkeep
We like a spring-and-fall rhythm, plus a look after windstorms. From the ground, use binoculars to scan valleys, rakes, and chimneys. Clear leaves from valleys and keep gutters flowing so drip edge isn’t overwhelmed.
Inside, pop into the attic after heavy rain. Damp sheathing near penetrations is your early warning. And please, no pressure-washing shingles, it can force water under flashing and void warranties.
Ice Dams, Wind-Driven Rain, and Coastal Exposure
In the Cascades and high country, ice dams form when heat leaks melt snow that refreezes at eaves. Air sealing and insulation reduce ice dams, and self-adhered membranes at eaves buy time U.S. DOE on ice dams. Heat cables are last resort.
For Seattle-style storms, we beef up side laps and use sealed underlayment in key spots to resist wind-driven rain. Along the coast, stainless steel flashing and fasteners perform best, and we avoid mixing metals that salt spray will pit. FEMA’s coastal guide has solid details for builders FEMA P-499.
Conclusion
So, what is roof flashing? It’s the quiet craft behind a dry house, shaped metal, smart overlaps, and materials matched to the climate. If we respect the details, kickouts at walls, proper step laps, solid counter flashing, the roof works with rain instead of fighting it.
When in doubt, have us (or a trusted local pro) inspect the joints, not just the shingles. The smallest metal pieces too often decide whether a roof lasts five years or thirty.
Roof Flashing: Frequently Asked Questions
What is roof flashing and why is it important?
Roof flashing is thin, shaped metal installed at joints—roof-to-wall intersections, chimneys, valleys, skylights, and pipes—to steer water onto the roof surface. Because roofs shed (not seal) water, flashing blocks capillary and wind-driven intrusion. It’s required by IRC R903.2.1; missing, mis-lapped, or corroded flashing is a leading leak source.
What are the main types of roof flashing and where are they used?
Main types include step flashing at sidewalls, counter flashing over masonry, base/apron flashing at dormer and chimney bottoms, and valley flashing where planes meet. Drip edge and kickout flashing manage eaves and rakes. Pipe boots seal vent stacks, skylights use factory kits, and chimneys often need a cricket.
How do you know roof flashing is failing?
Warning signs of failing roof flashing include ceiling stains near exterior walls, peeling paint, or swollen trim. In the attic, look for rusty nails, dark sheathing, or daylight at chimneys. Outside, spot cracked pipe boots, bent valley metal, loose mortar at counter flashing, or gutters overflowing behind drip edge.
How much does roof flashing repair cost?
Roof flashing repair costs vary by location, access, and height. Typical ranges: replace a pipe boot $150–$450; valley metal $300–$900; chimney reflashing with counter flashing and a small cricket $800–$2,500; skylight flashing kits with labor $600–$1,500. During full reroofs, new step flashing and drip edge are usually included.
How long does roof flashing last, and which materials are most durable?
Service life depends on material and climate. Galvanized steel roof flashing often lasts 15–25 years; aluminum 20–30; copper 50+; stainless 50+ (best for coastal). Rubber/EPDM pipe boots typically last 10–15. UV, salt spray, acidic woods, and mixed metals shorten life; matching fasteners and correct laps extend it.
Can roof flashing be reused during a reroof?
Usually it’s replaced. Step flashing, valley metal, and drip edge are commonly renewed to meet code and manufacturer warranties, and removal often distorts old pieces. High-value copper or stainless in excellent condition may be reused selectively, but only if details still meet current specs and pass a pro inspection.
Matej Mikula is a Porrentruy-based master roofer specializing in sustainable roofing installations and repairs for residential and commercial properties across Switzerland.
Recent Post